PIONEER DDJ-FLX4


for VirtualDJ 2023 +
Last Update : January 2023


SETUP


Firmware & Drivers


Firmware: No firmware update is available at the time this manual was written, but always make sure your device is on the latest firmware. Check availability at https://www.pioneerdj.com/en/support/software/controller/ddj-flx4/

Drivers There is no driver to install for both Windows and Mac OSX. The DDJ-FLX4 is a USB Class Compliant device and your Operating System (Windows/mac OS) will install and use the standard audio driver when the device is connected to your Mac/PC with a USB cable

VirtualDJ Setup


Download and install VirtualDJ from https://www.virtualdj.com/download/index.html (in case you have not done already)

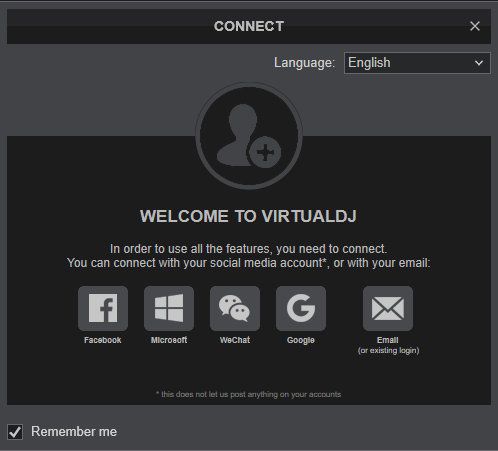
Once VirtualDJ is opened, a Connect Window will appear. Login with your virtualdj.com account.

A Pro Infinity, a Subscriber or a PLUS License is required to fully use the Pioneer DDJ-FLX4. Without any of the above Licenses, the controller will operate for 10 minutes each time you restart VirtualDJ.
https://www.virtualdj.com/buy/index.html


A detection window will appear next asking to use or not the pre-defined audio setup with the built-in sound card of the DDJ-FLX4.

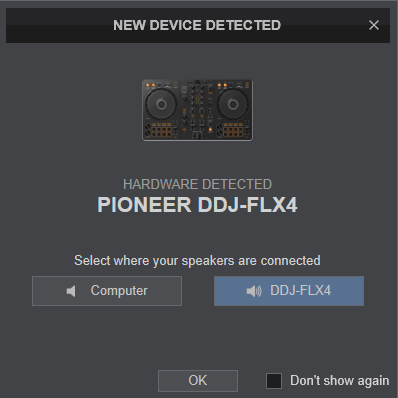
Click on the "DDJ-FLX4" button if speakers are connected to the Master Output of the DDJ-FLX4. You can still change that from Settings->AUDIO tab.

Click to OK.


The unit is now ready to operate with VirtualDJ.


MIDI Operation


The unit should be visible in the MAPPING tab of Config and the “factory default” available/selected from the Mappings drop-down list. The factory default Mapping offers the functions described in this Manual, however those can be adjusted to your needs via VDJ Script actions.


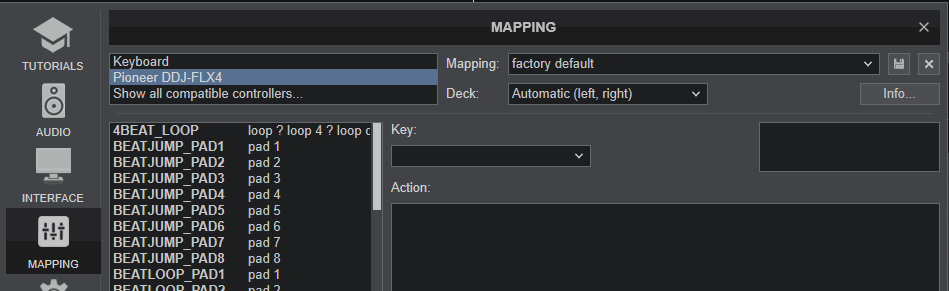
Find more details at https://www.virtualdj.com/wiki/VDJ8script.html

AUDIO Setup


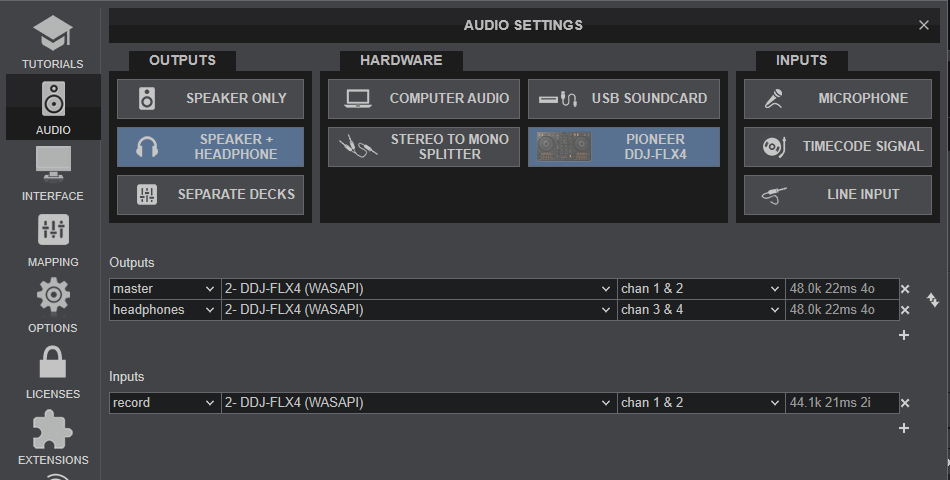
The unit has a pre-defined Audio setup and a special button in the AUDIO tab of Config to provide that.


Please read the manual of DDJ-FLX4 for further functionality https://www.pioneerdj.com/en/support/documents/controller/ddj-flx4/

For further software settings please refer to the User Guides of VirtualDJ. https://www.virtualdj.com/manuals/virtualdj/index.html
 

CONTROLS


KEY

ACTION

SHIFT (SECONDARY) ACTION

S SHIFT
Press this button down to access secondary actions as described in the SHIFT ACTION column
1 PLAY
Play-pause loaded track
Play-stutter loaded track
2 CUE
Set a temporary Cue point at current position when track is paused or preview while pressed if Cue point is assigned. Return to this Cue point when track is playing
Jump to the beginning of the track
3 JOG
Touch-sensitive jogwheel for scratching (Vinyl mode enabled), pitch-bending (Vinyl mode disabled) of fine Loop In/Out adjustments. Vinyl mode can be enabled/disabled from VirtualDJ GUI
Fast-searching through loaded track
4 LOOP IN
When not in loop, set current position as the beginning of a Manual Loop. When in loop, jump to the beginning of the loop. Hold for more than 2 seconds to trigger a 4 beats auto-loop.
Enable/disable Loop In Adjust mode. When this mode is enabled and track is in loop (led blinks), use the jogwheel to fine-adjust the Loop In point.
5 LOOP OUT
When not in loop, set current position as the end of a Manual Loop and trigger the loop. When in loop, exits the loop
Enable/disable Loop Out Adjust mode. When this mode is enabled and track is in loop (led blinks), use the jogwheel to fine-adjust the Loop In point.
6 RELOOP/EXIT
When in loop, exits the loop. When not in loop, enables the last triggered loop and jumps to its beginning.
Same action.
7 CUE CALL <
When in loop, halves the size of the loop in beats. When not in loop, loads the previous saved loop slot or saves it if empty
Delete the current Saved loop slot.
8 CUE CALL >
When in loop, doubles the size of the loop in beats. When not in loop, loads the next saved loop slot or saves it if empty
Saves a loop of the selected beats in size to an empty Saved loop slot.
9 BEAT SYNC
Syncs deck with the opposite one (matches BPM and phase) or with the Master-Deck (if more than 2 decks). Press for more than 2 seconds to set a Deck as Master-Deck.
Selects the next available % range for Pitch
10 PITCH
Adjust the tempo/pitch of the deck.
.
11 PADS
12 PAD MODES
13 CROSSFADER
Blends audio between the Left and Right assigned decks
Additional function: If Fader Start is enabled, start deck when reach its side, and stop if reaches the other side. See Settings
14 DECK LEVEL
Adjust the Output volume of the Left/Right assigned deck.
Additional function: If Fader Start is enabled, start deck when fader is moving from the zero position to a higher one and stop the deck when fader reaches zero/minimum position. See Settings
15 CUE/PFL
Sends left/right deck's audio (pre-fader) signal to Headphones channel, for pre-listening
.
16 CFX
Apply the selected Color FX (by default High-Low pass Filter) to Left/Right deck. When in middle position, no Color FX is applied.
.
17 SMART COLOR FX
When enabled, the Gain/Trim of Left/Right Deck will be temporary set to minimum when the Color FX knobs reach at the left/right edges, offering additional mute to the applied Color FX
18 EQUALIZER
Adjust the Low, Mid and High frequencies of the Left/Right assigned deck.
Note The device is offering Full Stems controls. See details at EQ Modes
.
19 TRIM
Adjust the applied Gain. When in middle position, the applied gain is following the zeroDB VDJ setting value.
20 VU METER
The leds indicate the level of the Left/Right decks..
21 LOAD
Loads the selected track from Browser to Left/Right decks
Left LOAD : sets Sideview as focused Browser window.
Right LOAD : Cycles Sideview view (Automix, Sidelist, Sampler, Karaoke and Shortcuts)
22 BROWSE
Scroll through files/folders. Push to toggle focus between Folders and Tracks Lists in Browser
Push to set focus to Folders List.. If focus is in Folders List, open/close sub-folders
23 MIC LEVEL
Adjust the level of the Microphone input signal.
24 PHONES MIX
Blends audio in Headphones, between the Decks that their PFL/CUE is enabled and the Master Output (if the MASTER CUE/PFL is enabled).
25 PHONES LEVEL
Adjust the Volume of the Headphones output.
26 SMART FADER
Enable/disable Smart Fader mode. When enabled (led turned on) :
- The BPM of the other (non-live) Deck will be matched to the playing one.
- When crossfading between the 2 Decks, both Decks will have the same BPM and at the end of the transition, both Decks will have the BPM of the other Deck.
- The levels of EQ LOW will be automatically altered during the transition
- An Echo Out Mix FX will be applied at the end of the transition.
Same as the non-SHIFT action with the difference of the Reverb Mix FX applied instead of Echo Out (led will blink)
27 MASTER LEVEL
Adjust the Volume of the Master output.
28 MASTER CUE
When enabled, sends audio signal from the Master Output to Headphones channel (PHONES MIX knob needs to be at a position higher to minimum.
29 FX ASSIGN
Select the Deck (1=Left, 2=Right or 1&2=both Left & Right) to which the selected Effect will apply to
30 FX SELECT
Select the next available Effect for the selected Deck(s)
Select the previous available Effect for the selected Deck(s)
31 BEAT <>
Select the previous/next size in beats for the selected Beat-aware Effect
Left button to re-analyze Track
Right button to manual tap the Track's BPM
32 FX LEVEL
Adjust the 1st Parameter of the selected Effect
33 FX ON
Triggers the selected Effect to the selected Deck(s)


FRONT & REAR PANELS


CONNECTION

DESCRIPTION

34 USB
Use a USB-C cable to connect DDJ-FLX4 to a USB port of your computer
35 MASTER
Use standard RCA Stereo cable to connect to amplifier/speakers. The Volume of this un-balanced output is controlled from the top panel
36 *MIC
Use a 3/4" TRS cable/adapter to connect a Microphone.
37 *MIC ATT
Adjust the attenuation of the Microphone input signal. Avoid setting to high position to prevent unwanted audio distortion
38 PHONES
Use a 1/4" mini-jack cable/adapter to connect a pair of Headphones for pre-listening. The Volume of this output is controlled from the top panel


* Note: The Microphone input is not part of the USB Audio Interface of the DDJ-FLX4, therefore it cannot be included to the Audio setup of VirtualDJ, but can be recorded along with your mix.See Advanced setup


ADVANCED SETUP


MICROPHONE


The Pioneer DDJ-FLX4 offers a Microphone input (connection at the rear panel) and level control at the top panel. The signal of this input is directly routed to the Master Output (rear connection), is not part of the USB Audio Interface, and cannot be included in VirtualDJ Audio setup. None of the Mic controls of the device will control mic-related VDJ actions or GUI buttons and vice-versa.

RECORD-BROADCAST


The Pioneer DDJ-FLX4 offers a dedicated Record input and this is part of the default Audio setup. As long as the setup is as per the following image, your mix will be recorded including the signal from the Microphone input.
If for some reason you don't want the Microphone input to be recorded, or the recorded signal is low, you can remove this line and your mix will still be recorded.


Record Input - DDJ-FLX4 Default Audio setup


MASTER OUTPUT


In case you don't have any speakers available (use your laptop's built-in) or need to use a different USB sound card with your speakers connected there, you will need to change something in the Mapping of the DDJ-FLX4 or else the Master Level knob will not alter the output volume.
Goto VirtualDJ Settings ->MAPPING tab, select the Pioneer DDJ-FLX4 and search for the ONINIT key.
Remove the fake_master on action. A new Custom mapping will be created and you can select between this and the factory default, depending on your audio setup.

Also in this case, keep the Master Output line assigned to Chans 1,2 of the FLX4 Audio interface (or else the Record line will not carry any signal) and add a 2nd Master line in your Audio setup with Master assigned to the other sound card (your laptops or other)


For further Technical features and specifications, visit

Pioneer DDJ-FLX4
Product's Page


Hardware Integration Department
2023 - ATOMIX PRODUCTIONS


Reproduction of this manual in full or in part without written permission from Atomix Productions is prohibited.